

Load balancing with AWS and Ansible
In this post I’d like to run through how to get going with an Elastic Load Balancer(ELB) within AWS via Ansible. Load balancing your web application is a simple step forward in scaling your request capacity as well as helping out with rolling deploys and promoting/retiring servers in the future. It’s incredibly simple and straightforward to get something setup with Ansible which leaves you with an easy to understand orchestration playbook.
OVERVIEW
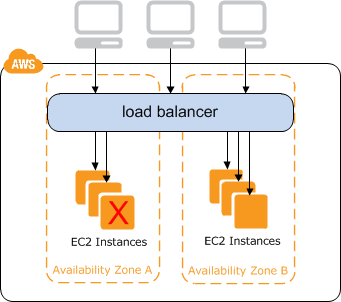
By the end of this post we’ll have the following configured within AWS:
- A classic ELB balancing requests between two newly created EC2 instances
- Two EC2 instances running nginx to demonstrate the ELB at work
- A simple security group for local access to the EC2 instances only to provision them
- Security group management facilitating communication between the ELB and EC2 instances
- Utilizing dynamic inventory throughout the whole playbook for simpler inventory management
I’ll be using my local machine as the control machine throughout this, some people may have a bastion host or Ansible Tower perhaps, modify as needed.
FIRST, DYNAMIC INVENTORY WITH AWS
When you’re working with Ansible it needs to know which resources are in it’s inventory or which ones it’ll be performing against. With Ansible, inventory is controlled via a static inventory file or you can utilize an executable file that returns resource information for Ansible, also known as dynamic inventory.
Ansible already has a pre-built dynamic inventory script for AWS which we’ll be utilizing to control AWS resources based on tags and other details.
To get going with AWS dynamic inventory make sure you’ve downloaded the AWS inventory scripts and configured Boto properly with your AWS settings.
I have profile/configuration groups setup in my ~/.boto file and for this post I’ll be targeting my personal group with the AWS_PROFILE variable. As an example your ~/.boto file should contain something along the lines of:
[profile personal]
aws_access_key_id=key
aws_secret_access_key=secret
I also store the ec2.py and ec2.ini files within an inventory directory to version control them:
$ ls inventory
ec2.ini ec2.py
Now that we have the AWS dynamic inventory script ready with our Boto configuration we can start interacting with AWS via Ansible.
A SIMPLE SECURITY GROUP
For the purposes of this tutorial I’m just going to setup a simple security group that allows access to the EC2 instances from my local machine. The default setup for an EC2 instance is to allow access to the machines within your default VPC(virtual private cloud) which means I wouldn’t be able to connect from my control machine(my laptop).
Most people are already going to have a security group in place for this, feel free to use that group ID instead. This was also just a great way to demonstrate how simple it is to manage security groups in AWS with Ansible.
Start a new playbook.yml file and add the first couple of tasks:
---

- hosts: localhost
  tasks:
    - name: Get my current IP address
      uri:
        url: http://checkip.amazonaws.com/
        return_content: yes
      register: my_ip

    - name: Create simple security group
      ec2_group:
        name: webservers
        description: A security group for my current IP
        region: us-west-1
        rules:
          - proto: tcp
            from_port: 80
            to_port: 80
            cidr_ip: "{{ my_ip.content | replace('\n', '') }}/32"
          - proto: tcp
            from_port: 22
            to_port: 22
            cidr_ip: "{{ my_ip.content | replace('\n', '') }}/32"
        rules_egress:
          - proto: tcp
            from_port: 80
            to_port: 80
            cidr_ip: 0.0.0.0/0
      register: webservers_group
One thing to keep in mind is that when we’re interacting with AWS the host is always going to be localhost since we’re controlling AWS via our local machine. You can think of how you’d typically use the AWS CLI which would be executed from your local machine and not on a remote host, the AWS CLI reaches out from your local machine to the AWS API to create/manage the various AWS resources.
For the first task I’m just grabbing my current IP utilizing Amazon’s checkip service and storing that in my_ip for use in the next task.
In the second task I’m creating a simple webservers security group that allows incoming access over port 80 and 22, outgoing access over any IP/port combination.
At this point go ahead and run the playbook just to ensure Ansible is properly connecting to AWS and able to manage security groups:
AWS_PROFILE=personal ansible-playbook -i inventory/ec2.py playbook.yml
CREATING THE LOAD BALANCER
Now that we have our security group defined I’m going to create the ELB. When adding a load balancer within AWS in order for the load balancer to connect to the EC2 instances they need to be in a common security group, if not then your instances will never be successfully added to the load balancer due to network issues. The simplest way to do this is to utilize the default ELB security group that AWS automatically creates and then add that group to the EC2 instances.
Add a new task to create the ELB:
- name: Create the ELB only listening over port 80
  ec2_elb_lb:
  name: nickhammond-load-balancer
    state: present
    region: us-west-1
    zones:
      - us-west-1a
      - us-west-1b
    listeners:
      - protocol: http
        load_balancer_port: 80
        instance_port: 80
  register: elb
Here I’m creating an ELB in us-west-1 over two availbility zones listening for outside connections over port 80 which will be forwarded to port 80 on all instances.
Go ahead and run the playbook again:
AWS_PROFILE=personal ansible-playbook -i inventory/ec2.py playbook.yml
If you were to login to your AWS dashboard at this point you’d see the new security group that was created as well as this new load balancer, easy peasy.
CREATING THE EC2 INSTANCES
To get started with our EC2 instances I just want to spin up two instances for the time being. The Ansible EC2 module provides a way for you to specify the exact count and it’ll calculate that count based on a tag key/value pair that you specify. For instance, I’m going to tag these instances with a key of ‘application’ and a value of ‘nickhammond’. Let me explain with a task and then I’ll come back to this, add this task to the bottom of your playbook.yml:
- name: Create EC2 instances
  ec2:
    key_name: nickhammond
    instance_type: t2.nano
    image: ami-f2b39792
    region: us-west-1
    group_id:
      - "{{ webservers_group.group_id }}"
      - "{{ elb.elb.security_group_ids | first }}"
    wait: yes
    instance_tags:
      application: nickhammond
    exact_count: 2
    count_tag:
      application: nickhammond
  register: ec2_instances
The new task for adding the EC2 instances is doing quite a bit, here’s a breakdown:
- key_name: Point this at an existing key pair name that you’ve configured in AWS.
- instance_type: We’re specifying the instance_type as t2.nano, this is a free tier instance.
- image: I’ve set the image to an AMI(image/snapshot in AWS) that’s for Ubuntu 14 LTS, this could be your own AMI or a public AMI within AWS.
- region: For now I just care about one region so I’m working within us-west-1.
- group_id: Two group IDs have been specified, one to allow connections from my local machine and the other one is the security group for the load balancer so that they can communicate.
- wait: Wait for AWS to respond that the instance was propery registered.
- instance_tags: This is where we set the tag for the instance, you can specify multiple key/value pairs here.
- exact_count: I’ve set this to just two since that’s all I care about right now, whenever Ansible runs this it’s going to ensure 2 EC2 instances exist with the mentioned count_tag.
- count_tag: This is the tag key/value pair that exact_count pays attention to. Ansible is going to utilize the ec2.py script along with the tags defined on the instances to ensure that 2 instances exist with the tag of application/nickhammond exist.
- register: Store the instance information in
ec2_instancesso that we can utilize it later with the elb.
Now that you’ve added the EC2 creation steps go ahead and run the playbook again:
AWS_PROFILE=personal ansible-playbook -i inventory/ec2.py playbook.yml
Once this finishes you should be able to see your new EC2 instances in your AWS dashboard with all of the settings that have been specified. You should also be able to access them over port 80/22 or whatever you ended up with for your security group rules from your local machine.
GETTING TO KNOW YOUR INSTANCES
Now that there are two EC2 instances running there are a few utility steps that need to run in order to help with the remaining tasks in the playbook. Add the following three tasks at the end of the playbook:
- name: Store EC2 instance IPs to provision against
  add_host:
    hostname: "{{ item.public_ip }}"
    groupname: ec2_instance_ips
  with_items: "{{ ec2_instances.tagged_instances }}"

- name: Wait for servers to come online
  wait_for:
    host: "{{ item.public_ip }}"
    port: 22
    timeout: 180
  with_items: "{{ ec2_instances.tagged_instances }}"

- name: Add EC2 instances as known hosts
  known_hosts:
    name: "{{ item.public_ip }}"
    key: "{{ lookup('pipe', 'ssh-keyscan -t rsa ' + item.public_ip) }}"
  with_items: "{{ ec2_instances.tagged_instances }}"
For the three tasks that we just added we’re storing the IP addresses of those machines, giving them a delay to wait for them to come online, and then adding them as known hosts to our local machine.
Since we need to provision against these hosts and we’re using dynamic inventory we need to tell which hosts Ansible is going to run against in some of the later steps. Using the add_host module you can put those machines into a group which you can then point a lists of tasks at. Also, normally Ansible takes care of adding a machine to your known_hosts file but with dynamic inventory we need to give Ansible a little nudge.
A SIMPLE PROVISIONER
Next in the playbook we need to do some simple provisioning on the new instances. For this example it’s just going to be nginx serving up a simple index.html page but it could be a whole web provisioning role or various roles.
We know which instances we want to provision because we registered the new IP addresses in the ec2_instance_ips variable, go ahead and use that for the host.
Add this next section at the bottom of the playbook:
- hosts: ec2_instance_ips
  remote_user: ubuntu
  become: True
  tasks:
    - name: Install nginx
      apt:
        name: nginx
        state: present
    - name: Create default index page
      copy:
        dest: /usr/share/nginx/html/index.html
        content: "Howdy from {{ ansible_hostname }}"
    - name: Restart nginx
      service:
        name: nginx
        state: restarted
These tasks should be pretty familiar and straightforward but this is just connecting to the known ec2_instance_ips as ubuntu(the default user on the AMI I’m using) and running a simple nginx install. I’ve added a task in there to set the default index page to respond with the machine’s IP in order to confirm that load balancing is working as expected.
Now run the playbook again to provision those instances:
AWS_PROFILE=personal ansible-playbook -i inventory/ec2.py playbook.yml
ATTACHING THE INSTANCES TO THE LOAD BALANCER
As the very last part of this we need to connect one last time from the local control machine to attach the EC2 instances to the load balancer. Add a new hosts section to the bottom of the playbook:
- hosts: localhost
  tasks:
    - name: Add each EC2 instance to the ELB
      ec2_elb:
        state: present
        ec2_elbs: nickhammond-load-balancer
        region: us-west-1
        instance_id: "{{ item.id }}"
      with_items: "{{ ec2_instances.tagged_instances }}"
Using the named load balancer that we created before and the known ec2_instances we can attach our instances to the load balancer.
Run the playbook again and you’ll see the load balancer put those instances in service in your AWS dashboard.
VERIFYING THE LOAD BALANCER
At this point you should be able to verify in your AWS dashboard that you have two EC2 instances running and 1 load balancer with both of those EC2 instances attached. You can easily see the load balancer in action by just making a request to the load balancer’s A record too:
$ curl nickhammond-load-balancer-382554036.us-west-1.elb.amazonaws.com
Howdy from ip-172-31-0-232%
$ curl nickhammond-load-balancer-382554036.us-west-1.elb.amazonaws.com
Howdy from ip-172-31-0-132%
We can see the load balancer returning our simple index.html page which displays the IP of where that page is being hosted from, success.
If you’re following along at home before I do some modifications to the full playbook file, here’s the sha for the current state.
SETTING UP ANOTHER APPLICATION
Now say that we need another load balanced stack that’ll be similar to what we just configured, we can utilize var files to add that additional flexibility. The new load balanced stack will be for the lobsters application so I’ll tag it as lobsters. I also want to make sure there’s a bit extra capacity for the application so I’ll set the instance_count in the var file so that we can create three instances instead of the default two.
Create a new var file in inventory/staging/group_vars/lobsters.yml and set the application name:
---
application: lobsters
instance_count: 3
Modify the playbook to replace the instances of nickhammond in the name so that they now reference the application that’s loaded from the var file as well as swapping the value for exact_count, it’ll look similar to this:
---

- hosts: localhost
  tasks:
    - name: Get my current IP address
      uri:
        url: http://checkip.amazonaws.com/
        return_content: yes
      register: my_ip

    - name: Create simple security group
      ec2_group:
        name: webservers
        description: A security group for my current IP
        region: us-west-1
        rules:
          - proto: tcp
            from_port: 80
            to_port: 80
            cidr_ip: "{{ my_ip.content | replace('\n', '') }}/32"
          - proto: tcp
            from_port: 22
            to_port: 22
            cidr_ip: "{{ my_ip.content | replace('\n', '') }}/32"
        rules_egress:
          - proto: tcp
            from_port: 80
            to_port: 80
            cidr_ip: 0.0.0.0/0
      register: webservers_group

    - name: Create the ELB only listening over port 80
      ec2_elb_lb:
        name: "{{ application }}-load-balancer"
        state: present
        region: us-west-1
        zones:
          - us-west-1a
          - us-west-1b
        listeners:
          - protocol: http
            load_balancer_port: 80
            instance_port: 80
      register: elb

    - name: Create EC2 instances
      ec2:
        key_name: nickhammond
        instance_type: t2.nano
        image: ami-f2b39792
        region: us-west-1
        group_id:
          - "{{ webservers_group.group_id }}"
          - "{{ elb.elb.security_group_ids | first }}"
        wait: yes
        instance_tags:
          application: "{{ application }}"
        exact_count: "{{ instance_count }}"
        count_tag:
          application: "{{ application }}"
      register: ec2_instances

    - name: Store EC2 instance IPs to provision against
      add_host:
        hostname: "{{ item.public_ip }}"
        groupname: ec2_instance_ips
      with_items: "{{ ec2_instances.tagged_instances }}"

    - name: Wait for servers to come online
      wait_for:
        host: "{{ item.public_ip }}"
        port: 22
        timeout: 180
      with_items: "{{ ec2_instances.tagged_instances }}"

    - name: Add EC2 instances as known hosts
      known_hosts:
        name: "{{ item.public_ip }}"
        key: "{{ lookup('pipe', 'ssh-keyscan -t rsa ' + item.public_ip) }}"
      with_items: "{{ ec2_instances.tagged_instances }}"


- hosts: ec2_instance_ips
  remote_user: ubuntu
  become: True
  tasks:
    - name: Install nginx
      apt:
        name: nginx
        state: present
    - name: Create default index page
      copy:
        dest: /usr/share/nginx/html/index.html
        content: "Howdy from {{ ansible_hostname }}"
    - name: Restart nginx
      service:
        name: nginx
        state: restarted


- hosts: localhost
  tasks:
    - name: Add each EC2 instance to the ELB
      ec2_elb:
        state: present
        ec2_elbs: "{{ application }}-load-balancer"
        region: "{{ item.region }}"
        instance_id: "{{ item.id }}"
      with_items: "{{ ec2_instances.tagged_instances }}"
We could take this further by moving the region and zone settings into the vars file to give it more flexibility as well, I’m going to leave it as is for now. To utilize the var file when running the ansible playbook you can utilize the -e option:
AWS_PROFILE=personal ansible-playbook -i inventory/ec2.py playbook.yml -e @inventory/staging/group_vars/lobsters.yml
Once you run that you’ll have a new load balancer named lobsters-load-balancer connected to two new machines. To get our original stack running with these new vars we just need a new var file in inventory/staging/group_vars/nickhammond.yml:
---
application: nickhammond
instance_count: 2
Also note that if you need to add an instance to one of these load balanced stacks you can now just update the instance_count variable and Ansible will add an additional machine and do the provisioning. The load balancer wouldn’t make it available until it passed the health check sucessfully as well which means you could do this it any point to add additional resources.
For the full playbook, here’s the github repository that I utilized while writing this post.